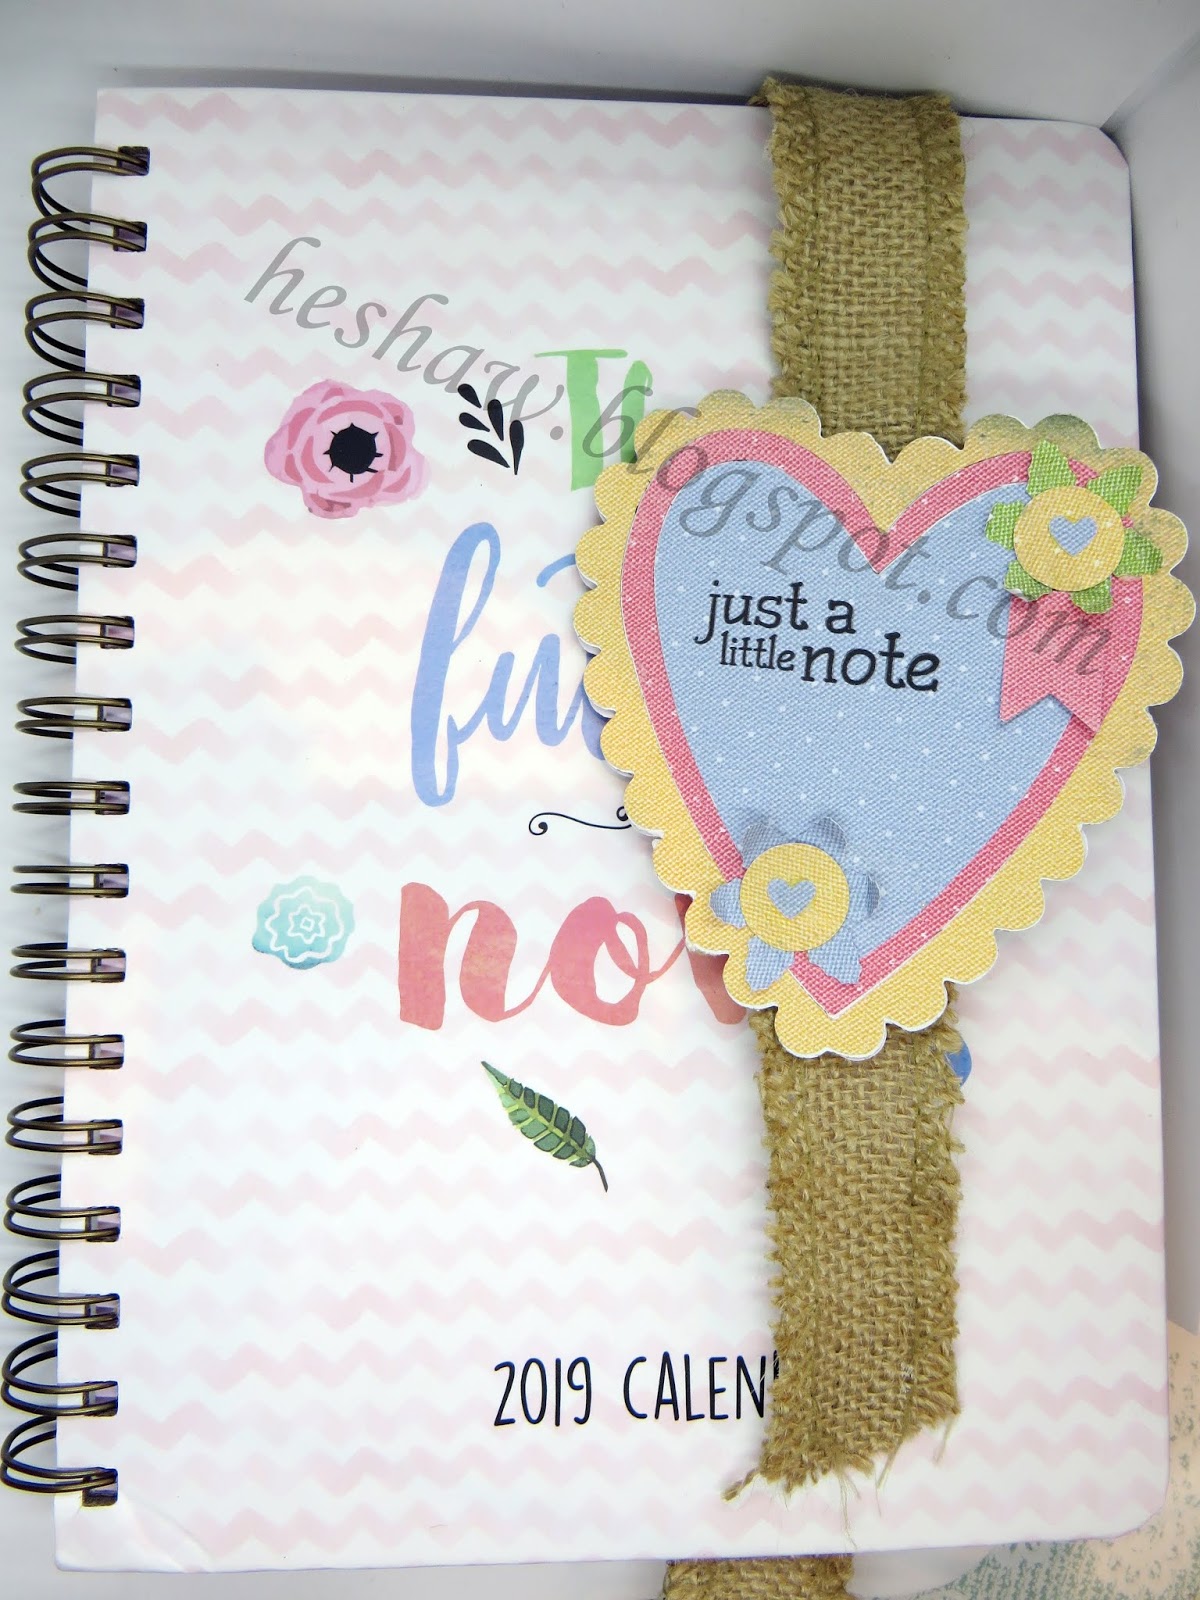
Happy Friday all! this weeks theme was " Hearts" and thought i would do something different this time: using all the papers from the Distress ink paper bundle printed and folded into quarters, using a heart shaped die ( or cut by hand) carefully place approx 1/2 inch before the folded point , print and cut cut several pages, when opened it looks like a flower!! Cut the front and back heart from a cereal packet and covered this also using the papers, glued onto a strip of hessian and carefully adhering the folded hearts shaped pages you have a notepad on the go in your favourite diary/notebook : the sentiment is using my " go to" sensational everyday stamps which is a " must have set" flowers are used using punches from my stash and the left over scraps, go on give this a go its quite simple and useful project! until next time Happy Crafting all :-)
Pages
- Home
- About me…. After forty years of the daily hustle, I officially traded my briefcase for a crochet hook in September 2025! My life is a colourful tapestry woven with love, family, and a lifelong obsession with making things by hand. When I'm not lost in a sea of paper (my favourite obsession since 2008!), you’ll find me adventuring with my husband, John, and our big, fluffy shadow, Moosh—an 8-year-old Bernese Mountain Dog with a heart as big as his paws. My greatest treasures are my daughter, Lauren, and the three little stars who call me Nana: Harper, Callie, and Casey. I’ve been crafting stories and keepsakes since childhood, and now I finally have all the time in the world to let my imagination run wild! ✨🧶✂️
- Design Teams
- Challenges
Friday, 11 January 2019
Friday, 4 January 2019
Thanks for everything
Hi Everyone:
How exciting I'm a new guest designer with Polkadoodles and we are going to have lots of fun ! This first post is a Thank you card which is adorable don't you think?, the image is from the Twiggy and Hoots Digi stamp and you can find it by clicking HERE, Taking the image into Serif and using the circle punch tab I punched two circles into the image ! So easy and so much you can do with this image . The sentiment " Thank you for everything can also be found on the Winnie celebrations 2 collection there is so much to choose from in this collection! The backing paper is also found on the website by clicking HERE This collection will coordinate with your Tim Holtz distress or oxide inks. I hope you like my first project and is inspirational. bye for now, Nelly
Friday, 21 September 2018
Foam Roses
Well what can i say is been almost a year since I blogged ! ...naughty Nelly :-) I intend to correct that from now on ill post on a Wednesday evening my crafty make for that week:
So just for starters (to right the wrong) I have a quick post of some white roses ( my favourite rose) made form Foamiran : Foam was cut into petals and coloured lightly with a green pastel oil crayon, finger rolled and adhered with hot glue. I hope you like them as much as I do....now im off to plan next weeks post ....erm what shall i make?
Monday, 2 October 2017
Foamirian flowers and stamens.
Hi Everyone,
Recently i attended a foam flower making beginners class and i acquired another addiction :-) i decided to share my journey with you! the pictures below are not the flowers i made at the class, instead i opted to have a go myself.
I started by making the stamens: i first took some cotton thread and brushed the cotton with clear drying pva glue, next i placed liquid pearls on the ends and dipped into mirco beads and left to dry.
I didn't want to use my finer foam just yet as I'm only practising, so i cut 1mm foam into love heart shapes (10 petals in total, i coloured the ends with Faber Castell Gelatos in Raspberry, then i warmed on an ordinary iron on silk setting, rolled and shaped each love heart by hand, ensuring the very top of the petals was rolled tightly, gently stretch out taking care not to stretch out the tips of the petals or they will go smooth again.
Once my stamens was dry i wrapped fine wire around them to make the centre, i had also cut a fine fringe from a strip of foam and rolled also with my stamens.
Next i glued the pointed tips of my love hearts only onto the created stamen centre, working 5 petals around the centre and 5 more around the outside.
next time i hop to show a step by step guide . hope you like the flower :-)
Monday, 17 April 2017
Nellys Crafty Card Attack: CHIN CHIN ! clean and simple
Nellys Crafty Card Attack: CHIN CHIN ! clean and simple: Surprise!!!....been a while since i posted a clean and simple, one layer cards so here you go.... using the "uncorked"stamp set !...
CHIN CHIN ! clean and simple
Surprise!!!....been a while since i posted a clean and simple, one layer cards so here you go.... using the "uncorked"stamp set !
Friday, 1 July 2016
Fun and Festive Altenew cottage
Hi Everyone, ,
Yeah its Friday and at the moment not raining! I've had the Altenew cottage sometime now and when I saw Sue Wilson's festive collection i just new how i wanted to use this with my Altenew stamps ! so today i have used the cottage stamp ! I have decorated the card using the holly die also by Sue Wilson. Go on treat yourself :-)
Thursday, 23 June 2016
Altered box with Altenew daisy stamp decoration
This post is a little picture overload so ill just keep it breif and let you look ! I desperately needed something to store my framlit, thin dies and storage is so expensive so i used everything from my food cupboard, scrap card trays and stash box ! oh except for the Altenew daisy stamps :-) thanks for looking, id love you to leave a little love on my post. when i get time i will post instructions....bye for now and happy crafting folks!
Tuesday, 24 May 2016
3 tier Box of soup stamps :-)
Afternoon all. been a a week since my last post so quickly wanted to show you all a 3 tier box card i made and decorated using the Polkadodles stamp soup stamps and printable papers from the CD you can find them HERE! I stamped the images using various colours of memento dye inks pad. the boxes inside are deep enough for my favourite chocolates to go inside , i have been informed it fits 4! you know the ones in the gold wrappers with almond nut coating lol! hope this inspires you, bye for now and Carry on crafting folks!
Saturday, 14 May 2016
Love him Minions!
Good Morning everyone, A quick post from me today, Its is my Hubby's Birthday so i thought id share the card I made for him using avery elle balloon die and heart stamps by Bo Bunny, the I love you die is from my favourite things, I love this shape card and can be so versatile.
until my next post "Carry on crafting Folks!"
Monday, 9 May 2016
Altenew Pine Tree
Hi all,
This card has been made using the Altenew pine tree stamp: Its quite a small stamp approx 2 inches, so I layered one stamp down and masked the tree and built it up to be a little taller, I did a second generation stamping in the background, then applied a circle mask and applied stormy sky and faded jeans distress inks using the brush technique, I going to do more of this design using other coloured dye inks and will add them to this post later.
Until my next post "Carry on Crafting folks!"
Sunday, 8 May 2016
Cool it down! ; Christmas Robins
Hi Everyone.
What a warm beautiful day it is here in Nottingham! This Card was already planned for my Chat and craft Class today and I'm feeling rather amused that it is probably the warmest day of the year and we're making a Christmas A4 stepper card !
The bauble ornament was a free gift from a craft magazine i bought some while ago, its a Desire one! magazine, the robins are coloured with pro markers and are cut out from a craft UK stamp set, the die cut snowflakes are from spellbinders. i have snipped into a snowflakes frame die from memory box to create the borders, the string and bows are also a memory box die. the snowy background has been stamped in versmark and emboss with white embossing powder.
The season greetings sentiment is taken from tonic cracker die set. stickle glitter glue to give it all some festive sparkle.
Off now to create some more lovely cards with my craft group.
enjoy the rest of this lovely Sunday, sunny day!
until my next post "carry on crafting folks!"
Monday, 2 May 2016
Say it with Roses !
Hope you have all enjoyed the Bank Holiday! another quick post from me again using the Altenew Beautiful Day stamps! this time using shades of reds.
Happy Crafting Folks!
Sunday, 1 May 2016
Altenew: Its a Beautiful day ! same but different
Hello everyone, Its another Bank Holiday here without the sunshine, Not very bright pictures but its getting quite late and dull here. Today I didn't have a chat and craft class so decided to have a play with my new favourite stamps Build a flower set by ALTENEW, I set myself a challenge to use the same ingredients and make 2 different cards! I'm quite happy with the end results and thought id share them with you for some inspiration.
I've used shades of brown dye ink for the sepia look to the flower and leaf images, leaf die, stitched triangle die, twine and background paper, finishing the card with "Just because" sentiment.
Enjoy the rest of the Bank Holiday weekend and Happy Crafting Folks!
I've used shades of brown dye ink for the sepia look to the flower and leaf images, leaf die, stitched triangle die, twine and background paper, finishing the card with "Just because" sentiment.
Enjoy the rest of the Bank Holiday weekend and Happy Crafting Folks!
Wednesday, 20 April 2016
Lucky Horseshoe Wedding Cards: Handmade chat and craft projects
Happy Wednesday everyone, as promised I'm Blogging the chat and craft class card up for you all to see, we have matted and layered using the pin dot square dies from tattered lace, the horseshoe and rings were die cut using the set Britannia die set and we layered these 3 time using a contrast colour in the middle.we placed these around the sentiment that I created in serif, embellished with a lucky white feather, punched hearts and gems. hope you like this card. I made this card in various colours.
Happy Crafting Folks!
Bye for now
Saturday, 9 April 2016
Saturday afternoon play time Owl Soup Recipe
Hi all,
I have arrived home today from a short break in Newquay with my Hubby following him working away in China since Christmas and we had a wonderful time.
My new craft stamps was simply crying out to be played with and I wanted to make John a card for spoiling me during our stay.
I couldn't decide what to play with first so I opened all my new stamp sets ( soup stamps. Bo Bunny owl set) and decided to put them together to see what I came up with and I really please with the end soup recipe lol! here is the end result!
I cut the stitched rectangle dies first and placed them flat onto a 6x6 inch card with removable dots, i then stamped the first owl, masked it and stamped another one by its side, then masked them both and stamped images from the Polkadoodles soup collection around the owl images, then i placed a round acrylic block over the owl to give the impression of a moon and brushed over with blue distress ink over the whole card, I put 3mm foam tape on the rectangle die cut frame. the sentiment is from an Avery Elle stamp set, For the colouring i have used my letraset flex markers.
Iv'e thought of so many variations i can do with these stamps so I will adapt this card design for my craft & chatter group !
Until my next post "Happy Crafting Folks!
Saturday, 26 March 2016
Relax with a cocktail of choice: its a holiday !
Happy
Easter to everyone!, Sorry for not posting anything for a while, can’t believe
how fast time passes. So what I have been up too? ...well I've been very busy
crafting :-) I have been holding classes on a Sunday afternoon which was a 12
week course but they have been so popular they will continue, so I've been very
busy and planning those, what I plan to do next is take a picture of the week’s
project and start to post them on a Wednesday again so watch this space!
For
now here is a commissioned Birthday card I made this weekend, thought id share it
with your all!
Enjoy
the Easter Holidays everyone and carry on
crafting folks
Thursday, 31 December 2015
Happy New Year 2016!!
A Quick post to wish you all a very Happy new year and health and happiness for 2016 to all.
For this card make I have used acetate and free glass and balloon dies dies from Simply Card and Papercraft magazine ! Border is cut from an xcut border punch, the " Happy new year sentiment is from my favorite set if scripted words from Woodware. I Hope everyone has a good evening tonight, and if you have no plans get out the craft stash!!, until my next post Happy Crafting folks!
Subscribe to:
Comments (Atom)


